


Diamond Measurements: All You Need to Know Before You Buy
Author: Alex K., CMO at Labrilliante Updated: 2025-10-07 Reading Time: 8 minutes
Professional labs use laser systems achieving 0.01mm precision for diamond measurements, while smart proportion choices like oval's 1.35:1 ratio can increase perceived size by 20-30% without changing carat weight. Strategic measurement selection near popular weights (0.95 vs 1.00 carat) saves 15-20% while maintaining visual impact.

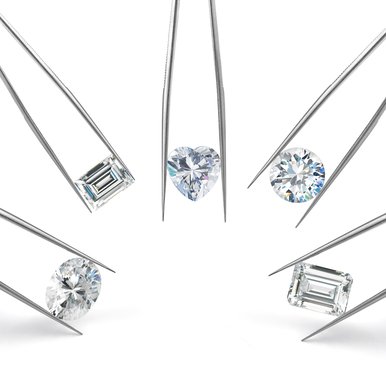
Buying a diamond without understanding measurements is like choosing a car by weight alone—you're missing half the story. Diamond measurements determine not just how impressive your stone looks, but how much value you extract from every dollar spent. This guide reveals professional measurement techniques, size optimization strategies, and cost-saving insights that jewelers rarely share with customers. You'll discover why two diamonds with identical carat weights can appear dramatically different and how to maximize visual impact within any budget.
When Millimeter Measurements Don't Tell the Whole Story
Some diamond experts argue that focusing heavily on millimeter measurements can mislead buyers into prioritizing size over quality factors that truly matter. A diamond measuring 7.4mm might seem impressive, but if it has poor cut proportions, significant inclusions, or noticeable color tint, the actual beauty and brilliance suffer dramatically. Critics point out that buyers obsessing over getting "maximum size per dollar" often end up with diamonds that look dull or cloudy despite measuring well on paper.
This concern holds merit when buyers sacrifice cut quality for size, particularly with fancy shapes where poor proportions create dead zones and light leakage. However, the solution isn't ignoring measurements—it's understanding how measurements work together with other quality factors. Professional measurement knowledge actually helps buyers identify well-proportioned diamonds that deliver both size and brilliance, avoiding the poorly cut stones that give measurement-focused shopping a bad reputation.
Understanding Carat Weight vs Millimeter Measurements
Carat weight measures a diamond's mass while millimeter dimensions show its actual physical size—two different properties that together determine both appearance and value. Think of it like comparing a car's weight versus its exterior dimensions. Both matter for your decision.
| Carat Weight | Round Brilliant Diameter (mm) | Princess Cut (mm) | Oval Cut (mm) | Visual Size Impact | Lab-Grown Price Range |
|---|---|---|---|---|---|
| 0.30 ct | 4.2mm | 3.8mm × 3.8mm | 5.5mm × 4.0mm | Delicate appearance | $180 - $450 |
| 0.50 ct | 5.1mm | 4.4mm × 4.4mm | 6.5mm × 4.8mm | Noticeable presence | $300 - $750 |
| 0.75 ct | 5.8mm | 5.0mm × 5.0mm | 7.3mm × 5.4mm | Elegant statement | $450 - $1,125 |
| 1.00 ct | 6.5mm | 5.5mm × 5.5mm | 8.0mm × 6.0mm | Classic size milestone | $600 - $1,500 |
| 1.25 ct | 7.0mm | 5.9mm × 5.9mm | 8.5mm × 6.3mm | Substantial presence | $750 - $1,875 |
| 1.50 ct | 7.4mm | 6.3mm × 6.3mm | 9.2mm × 6.8mm | Impressive visual impact | $900 - $2,250 |
| 2.00 ct | 8.1mm | 6.9mm × 6.9mm | 10.0mm × 7.5mm | Dramatic statement piece | $1,200 - $3,000 |
| 2.50 ct | 8.7mm | 7.4mm × 7.4mm | 10.7mm × 8.0mm | Luxury showcase | $1,500 - $3,750 |
| 3.00 ct | 9.3mm | 7.8mm × 7.8mm | 11.3mm × 8.4mm | Exceptional presence | $1,800 - $4,500 |
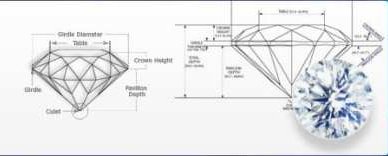
How to Measure Diamond Size in Millimeters
Professional gemologists measure three dimensions: length, width, and depth. They use specialized instruments accurate to 0.01mm. Length captures the longest distance across the diamond's girdle. Width measures perpendicular to length. Depth spans from table to culet.
Standard jewelry loupes help with visual assessment but lack precision for exact measurements. Professional labs use laser measurement systems under controlled conditions. These account for girdle thickness variations that affect apparent size.
Length-to-width ratios matter more for shape appeal than carat weight alone. A 1.50-carat round measures about 7.4mm diameter. The same weight in oval format spans 9.2mm × 6.8mm—dramatically different visual impact despite identical mass.
Carat to Millimeter Conversion Chart Guide
Round brilliants follow predictable size patterns due to standardized proportions. Here's what to expect:
- 0.50-carat: 5.1mm diameter
- 1.00-carat: 6.5mm diameter
- 1.50-carat: 7.4mm diameter
- 2.00-carat: 8.1mm diameter
| Carat Weight | Round Brilliant (mm diameter) | Princess Cut (mm square) | Oval Cut (mm length × width) | Emerald Cut (mm length × width) | Marquise Cut (mm length × width) | Pear Shape (mm length × width) | Cushion Cut (mm square) | Radiant Cut (mm square) |
|---|---|---|---|---|---|---|---|---|
| 0.25 | 4.1 | 3.5 × 3.5 | 5.3 × 3.6 | 5.2 × 3.8 | 6.5 × 3.3 | 5.8 × 3.5 | 3.7 × 3.7 | 3.6 × 3.6 |
| 0.33 | 4.4 | 3.8 × 3.8 | 5.8 × 4.0 | 5.6 × 4.1 | 7.2 × 3.6 | 6.3 × 3.8 | 4.0 × 4.0 | 3.9 × 3.9 |
| 0.50 | 5.1 | 4.4 × 4.4 | 6.6 × 4.6 | 6.5 × 4.7 | 8.2 × 4.1 | 7.3 × 4.4 | 4.6 × 4.6 | 4.5 × 4.5 |
| 0.75 | 5.8 | 5.0 × 5.0 | 7.4 × 5.2 | 7.3 × 5.3 | 9.2 × 4.6 | 8.2 × 5.0 | 5.2 × 5.2 | 5.1 × 5.1 |
| 1.00 | 6.5 | 5.5 × 5.5 | 8.0 × 6.0 | 8.0 × 5.8 | 10.0 × 5.0 | 8.8 × 5.5 | 5.7 × 5.7 | 5.6 × 5.6 |
| 1.25 | 6.9 | 5.8 × 5.8 | 8.5 × 6.4 | 8.5 × 6.2 | 10.6 × 5.3 | 9.3 × 5.8 | 6.1 × 6.1 | 6.0 × 6.0 |
| 1.50 | 7.4 | 6.2 × 6.2 | 9.2 × 6.8 | 9.1 × 6.6 | 11.4 × 5.7 | 9.9 × 6.2 | 6.5 × 6.5 | 6.4 × 6.4 |
| 1.75 | 7.8 | 6.5 × 6.5 | 9.7 × 7.1 | 9.6 × 6.9 | 11.9 × 5.9 | 10.4 × 6.5 | 6.8 × 6.8 | 6.7 × 6.7 |
| 2.00 | 8.1 | 6.9 × 6.9 | 10.1 × 7.4 | 10.0 × 7.2 | 12.4 × 6.2 | 10.8 × 6.8 | 7.1 × 7.1 | 7.0 × 7.0 |
| 2.50 | 8.8 | 7.4 × 7.4 | 10.8 × 7.9 | 10.7 × 7.7 | 13.3 × 6.6 | 11.6 × 7.3 | 7.7 × 7.7 | 7.5 × 7.5 |
| 3.00 | 9.3 | 7.8 × 7.8 | 11.4 × 8.4 | 11.3 × 8.1 | 14.0 × 7.0 | 12.2 × 7.7 | 8.1 × 8.1 | 8.0 × 8.0 |
| 4.00 | 10.2 | 8.6 × 8.6 | 12.4 × 9.1 | 12.3 × 8.8 | 15.2 × 7.6 | 13.3 × 8.4 | 8.9 × 8.9 | 8.7 × 8.7 |
These assume ideal cut proportions with 59-63% depth percentages. Fancy shapes deviate significantly. A 1.00-carat princess measures roughly 5.5mm square. Elongated shapes like marquise maximize coverage—a 1.00-carat oval typically measures 8.0mm × 6.0mm.
Depth percentage dramatically impacts these conversions. Deeper pavilions carry weight below the girdle, reducing apparent size despite higher carat weights. Shallow cuts maximize diameter but often sacrifice brilliance.
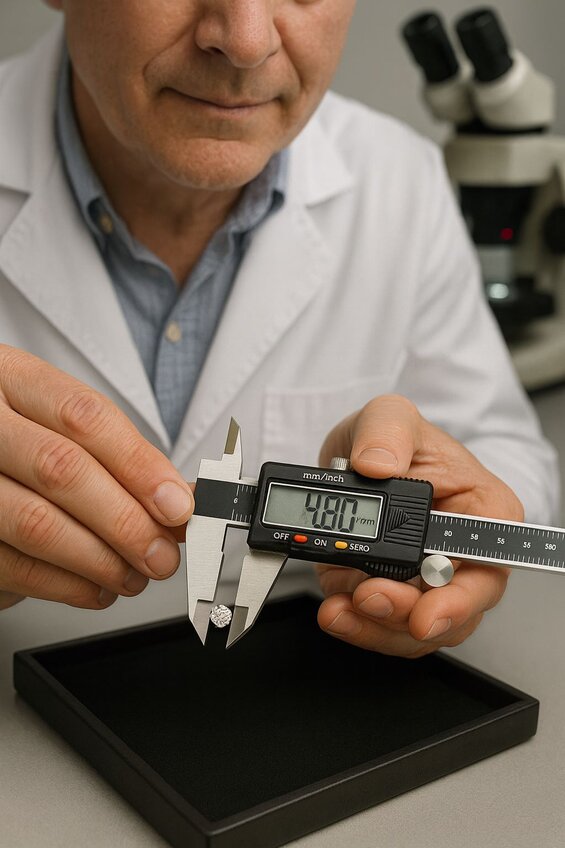
Diamond Diameter Measurement Tool Accuracy
Professional diamond gauges achieve 0.01mm precision under lab conditions. Consumer calipers typically provide 0.1mm accuracy—suitable for general verification. Temperature affects metal tools, potentially causing expansion or contraction errors.
"Understanding the interplay between carat weight and milimetric dimensions is crucial for assessing diamond value and aesthetics. While carat directly reflects the mass, dimensions offer a visual perspective critical in design and setting choices. Notably, the length-to-width ratio can dramatically alter a diamonds visual appeal, regardless of its carat. Thus, a comprehensive knowledge of both measures enhances our ability to tailor diamonds precisely to customer preferences without compromising on brilliance or style."
Major grading labs employ laser interferometry for dimensional analysis. These systems eliminate human error while creating permanent digital records. They capture not just basic dimensions but girdle thickness variations and pavilion angles.
Hand-held tools require proper technique. Position diamonds at the girdle plane, not above or below. Apply steady pressure to prevent slippage. Professional gemologists verify measurements at multiple points around the perimeter to identify irregularities.
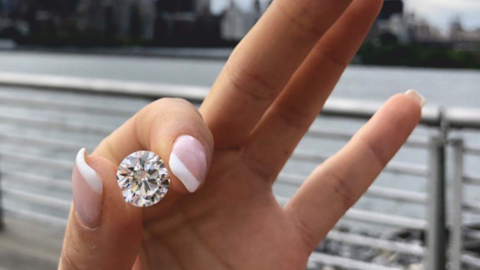
Maximizing Diamond Size Appearance on Your Finger
Smart proportion choices and strategic settings can increase perceived diamond size by 15-25% without changing actual carat weight. The key lies in understanding how length-to-width ratios and visual context affect size perception.
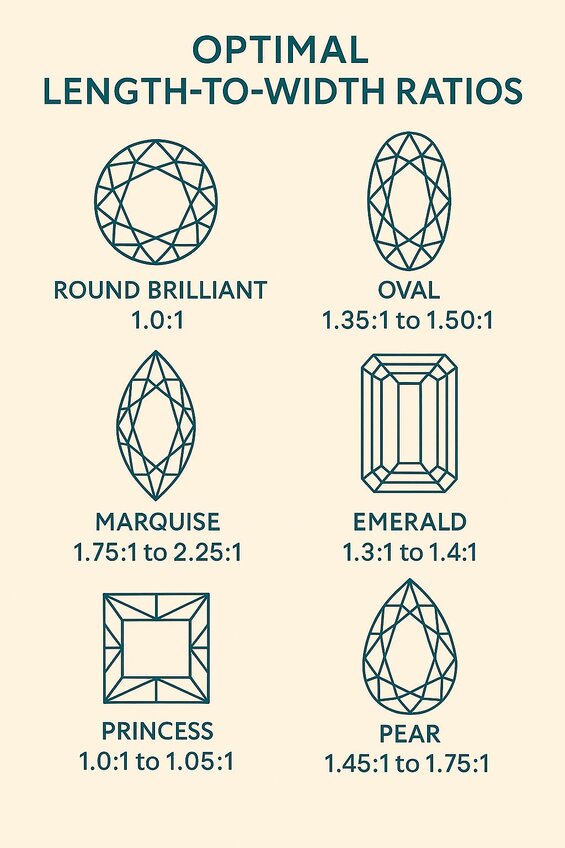
Length to Width Ratio for Different Shapes
Round brilliants maintain 1:1 ratios by definition. But fancy shapes offer flexibility that directly impacts size perception. Ovals achieve maximum size appearance with 1.35:1 to 1.50:1 ratios. Beyond 1.50:1, the elongated look can compromise brilliance through light leakage.
Marquise cuts optimize finger coverage at 1.85:1 to 2.10:1. Ratios exceeding 2.20:1 risk creating vulnerable pointed ends prone to chipping. Emerald cuts balance elegance with size at 1.30:1 to 1.50:1. Princess cuts typically range from 1.00:1 to 1.05:1 for optimal light performance.
Pear shapes require careful consideration. Ratios between 1.45:1 and 1.75:1 provide versatility for different settings. Extreme ratios beyond 1.80:1 can appear disproportionate despite increased length coverage.
Best Diamond Measurements for Finger Sizes
Finger proportions significantly influence optimal diamond measurements. Ring sizes 4-6 typically look best with diamonds measuring 6.0-7.5mm in their longest dimension. Sizes 7-9 can support 7.5-9.0mm measurements without overwhelming hand proportions.
Sarah's Size Optimization Success
Sarah, with a size 5.5 finger, had a $3,200 budget for a 1.0-carat round diamond (6.5mm diameter). While the round diamond fit her budget, it covered only 28% of her finger width (23.5mm), leaving significant visual space that made the stone appear smaller than its actual carat weight.
Her gemologist recommended a 0.95-carat oval diamond with optimal 1.37:1 length-to-width ratio, measuring 8.1mm x 5.9mm. The elongated shape provided 34% finger coverage along its length while the 5.9mm width maintained proportional balance. The slightly lower carat weight reduced the price to $2,400.
Sarah saved $800 while gaining 18% more visual coverage (8.1mm vs 6.5mm length). The oval's strategic proportions created the illusion of a larger stone equivalent to approximately 1.15 carats in visual impact. Photography comparisons confirmed the oval appeared noticeably larger on her finger despite the 0.05-carat difference.
Finger length affects shape selection beyond width considerations. Shorter fingers benefit from elongated shapes like ovals that create length illusion. Longer fingers suit round or square shapes for proportional balance.
Band width interacts with diamond measurements to influence visual impact. Thin 2mm bands emphasize diamonds measuring 6.0-6.5mm diameter. Wide 4mm bands require 7.5-8.0mm diamonds to maintain balance.
Visual Size Comparison Techniques
Professional jewelers use size comparison wheels to display multiple measurements simultaneously. This allows direct assessment of incremental size increases and their proportional impact—particularly valuable when comparing different length-to-width ratios.
Photography can mislead through lens distortion. Wide-angle shots exaggerate diamond size while telephoto compression minimizes dimensions. Consistent documentation requires standardized distances, lighting, and reference objects.
Halo settings increase apparent size by surrounding center diamonds with smaller accent stones. This creates optical illusion adding 0.5-1.0mm to perceived diameter. However, the enhanced perception disappears when the diamond is removed from its setting.
Diamond Cut Proportions and Quality Measurements
Proper cut proportions determine whether diamonds achieve maximum brilliance and size appearance, with depth percentage, table percentage, and crown angles working together to optimize light performance. Small deviations significantly impact overall visual results.
| Cut Proportion Parameter | Excellent Range | Very Good Range | Good Range | Impact on Light Performance | Lab-Grown Diamond Advantage |
|---|---|---|---|---|---|
| Depth Percentage | 59.0% - 62.5% | 57.5% - 59.0% / 62.5% - 63.5% | 56.0% - 57.5% / 63.5% - 65.0% | Optimal light return and brilliance | Precise control during growth process |
| Table Percentage | 54.0% - 58.0% | 52.0% - 54.0% / 58.0% - 60.0% | 50.0% - 52.0% / 60.0% - 62.0% | Balance of fire and brilliance | Consistent table proportions achievable |
| Crown Angle | 34.0° - 35.0° | 32.5° - 34.0° / 35.0° - 36.0° | 31.0° - 32.5° / 36.0° - 37.5° | Creates fire and dispersion patterns | Uniform crystal structure for perfect angles |
| Pavilion Angle | 40.6° - 41.0° | 40.2° - 40.6° / 41.0° - 41.2° | 39.8° - 40.2° / 41.2° - 41.5° | Critical for internal light reflection | Eliminates natural inclusion interference |
| Girdle Thickness | Thin to Slightly Thick | Very Thin to Medium | Extremely Thin to Thick | Affects durability and visual weight | Consistent girdle formation possible |
| Crown Height Percentage | 14.0% - 16.0% | 13.0% - 14.0% / 16.0% - 17.0% | 12.0% - 13.0% / 17.0% - 18.5% | Influences scintillation and fire | Precise height control during cutting |
| Pavilion Depth Percentage | 42.5% - 43.5% | 42.0% - 42.5% / 43.5% - 44.0% | 41.5% - 42.0% / 44.0% - 45.0% | Prevents light leakage through pavilion | No natural inclusion zones to avoid |
| Polish Grade | Excellent | Very Good | Good | Surface smoothness affects light scatter | Superior surface quality achievable |
Cut grade encompasses multiple interacting parameters. Depth percentage (depth ÷ average diameter) typically ranges 59-63% for optimal light return in round brilliants. Table percentage performs best between 54-58% for most applications.
Crown angles of 34-35 degrees work optimally with pavilion angles of 40.6-41.0 degrees. These create internal reflection patterns responsible for brilliance and fire. Pavilion angles beyond 41.2 degrees create light leakage through the bottom. Angles below 40.4 degrees produce shallow appearances with reduced scintillation.
Girdle thickness affects durability and visual appeal. Measurements from thin to slightly thick provide optimal balance. Extremely thin girdles risk chipping during setting. Very thick girdles add unnecessary weight without contributing to size or light performance.
Polish and symmetry grades complement cut proportions for overall quality. Excellent polish eliminates surface irregularities that scatter light. Excellent symmetry ensures facet alignment for optimal light patterns. These factors matter most in larger diamonds where imperfections become visible.
Value Optimization Through Smart Measurement Choices
Strategic measurement selection can increase apparent diamond size by 20-30% while maintaining budget constraints. Understanding relationships between measurements, visual impact, and pricing enables smart value decisions.
Carat pricing follows exponential progression with significant jumps at popular weights like 0.50, 1.00, 1.50, and 2.00 carats. Diamonds weighing 0.95 carats cost substantially less than 1.00-carat stones despite minimal visual difference—approximately 15-20% savings for less than 3% size reduction.
| Diamond Shape | 1.00 Carat Price (Lab-Grown) | Visual Coverage (mm²) | Cost Per mm² Coverage | Value Efficiency vs Round | Budget Optimization Rating |
|---|---|---|---|---|---|
| Round Brilliant | $1,200 | 31.7 | $37.85 | Baseline (0%) | Standard |
| Oval | $980 | 35.2 | $27.84 | +26% Better Value | Excellent |
| Marquise | $920 | 38.1 | $24.15 | +36% Better Value | Outstanding |
| Pear | $940 | 34.8 | $27.01 | +29% Better Value | Excellent |
| Emerald Cut | $880 | 32.5 | $27.08 | +28% Better Value | Very Good |
| Princess Cut | $950 | 30.2 | $31.46 | +17% Better Value | Good |
| Cushion Cut | $900 | 29.8 | $30.20 | +20% Better Value | Good |
| Radiant Cut | $870 | 31.1 | $27.97 | +26% Better Value | Very Good |
Shape selection dramatically impacts cost per visual coverage. Round brilliants command premiums due to higher rough waste during cutting. Fancy shapes like oval and marquise utilize rough more efficiently, translating to lower per-carat costs while providing distinctive appearances.
Ovals provide approximately 8% more visual coverage per dollar compared to rounds. Marquise shapes deliver 12% additional coverage, making them attractive for budget-conscious buyers seeking maximum size appearance.
Color and clarity requirements interact with measurements. Larger diamonds typically need higher color grades as tints become more noticeable above 1.00 carat. Certain shapes like emerald cuts reveal clarity characteristics more readily, requiring higher clarity grades regardless of size.
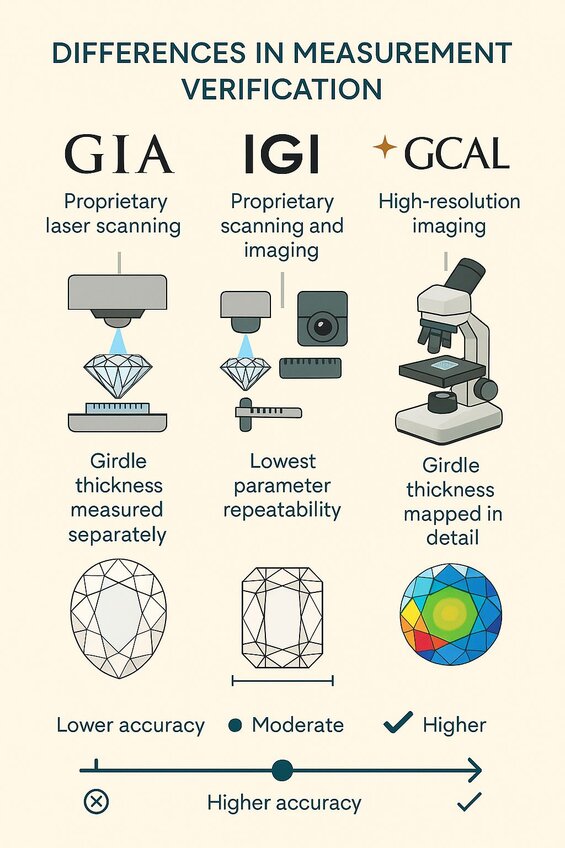
Certification Standards and Measurement Verification Methods
Major gemological laboratories employ standardized measurement protocols ensuring consistency across facilities, though minor methodology variations can produce slight differences. These standards establish common reference points while acknowledging equipment limitations.
GIA requires length, width, and depth documentation to 0.01mm precision using calibrated instruments under controlled conditions. Measurements occur at girdle diameter for rounds and maximum dimensions for fancy shapes. Protocols specify locations and averaging techniques for reproducibility.
IGI follows similar precision requirements but employs different averaging techniques for fancy shapes with irregular outlines. IGI documents measurements at multiple perimeter points, with final dimensions representing averaged values accounting for natural girdle variations. This sometimes yields 0.01-0.02mm differences from GIA reports.
GCAL incorporates advanced imaging technology capturing precise measurements alongside photographic documentation. Their approach includes girdle thickness mapping revealing variations around the perimeter—valuable information for setting purposes where irregularities might affect mounting requirements.
Verification techniques include comparison with certified reference standards and cross-verification using multiple devices. Professional jewelers maintain calibrated gauge sets enabling quick verification of reported dimensions, providing 0.05mm accuracy suitable for general confirmation rather than laboratory-grade precision.
Frequently Asked Questions
A 1-carat round diamond measures approximately 6.5mm while a 0.9-carat measures about 6.2mm—only a 0.3mm difference that's barely noticeable to the naked eye. This minimal visual difference means you can save 15-20% by choosing the slightly smaller stone without sacrificing perceived size.
A 1-carat round measures 6.5mm diameter while a 1-carat oval typically spans 8.0mm x 6.0mm, providing approximately 8% more visual coverage. The oval's elongated shape creates greater finger coverage and can appear 20-30% larger due to its length-to-width ratio of around 1.35:1.
Diamonds with poor cut proportions carry excess weight in areas that don't contribute to visual size, particularly in deep pavilions below the girdle. Additionally, extremely thick girdles add carat weight without increasing diameter, while shallow cuts may maximize diameter but often sacrifice brilliance and durability.
Length-to-width ratios dramatically influence both size perception and light performance—ovals perform best at 1.35:1 to 1.50:1 for maximum brilliance, while marquise cuts optimize coverage at 1.85:1 to 2.10:1. Ratios beyond these ranges can create light leakage or structural vulnerabilities at pointed ends.
Major labs like GIA and IGI achieve 0.01mm precision using laser measurement systems under controlled conditions. However, slight methodology differences in averaging techniques for fancy shapes can produce 0.01-0.02mm variations between lab reports, which is within acceptable professional standards.
Oval and marquise shapes deliver the highest visual coverage per dollar, with ovals providing approximately 8% more coverage than rounds and marquise offering 12% additional coverage. These fancy shapes utilize rough diamond material more efficiently during cutting, resulting in lower per-carat costs while maximizing finger coverage.
Use calibrated calipers positioned at the girdle plane with steady pressure to achieve 0.1mm accuracy suitable for general verification. Take measurements at multiple points around the perimeter for irregular shapes, though professional laser systems used by certification labs provide superior 0.01mm precision that home tools cannot match.
Prioritize measurements when comparing different shapes for maximum visual impact or when shopping near popular carat weights where small size differences create large price gaps. Focus on measurements particularly when selecting elongated shapes like ovals or marquise where length-to-width ratios significantly affect both appearance and light performance.